Tutorial 1
Facebook Setup & Advertising
Set up your page.
Give sellers a clear next step.
Four practical guides to connect your Facebook presence with your personalized ListPropertyNow.com seller page.
The connection: Paste your personalized public page URL into the ad’s Website URL field. The ad’s Learn More button opens that destination.
Tutorial 2
Personalize Your ListPropertyNow.com Page
Open guide →Tutorial 3
Send Facebook Ad Traffic to Your Page
Open guide →Tutorial 4
Share Your Page Without Running Ads
Open guide →Tutorial 1 · Start with your business identity
Set Up Your Facebook Business Page
 123
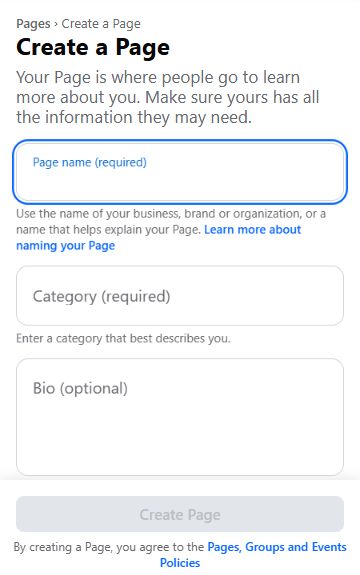
- Name: Sign in using your managing personal profile. Open Create a Page from Pages. Use your own professional or business name.
- Category: Choose the category that best describes your business, such as a real estate agent category when available.
- Bio: Explain whom you help and your service area. Include your brokerage and required professional disclosures where appropriate.
- Review Meta’s terms and create the Page when ready. Add a professional photo, a supplied Facebook cover, business contact information and brokerage details. Use business information you intend to make public.
Guided visual walkthrough
Step 1 of 4
Sign in with the personal profile that will manage your Page.
Move through each step at your own pace.
Already have a Page? Keep it. Switch into that Page and update its information instead of creating a duplicate. Agents should use their own business identity; the ListPropertyNow company Page is an example.
Tutorial 2 · Make your page yours
Personalize Your ListPropertyNow.com Page
 1234
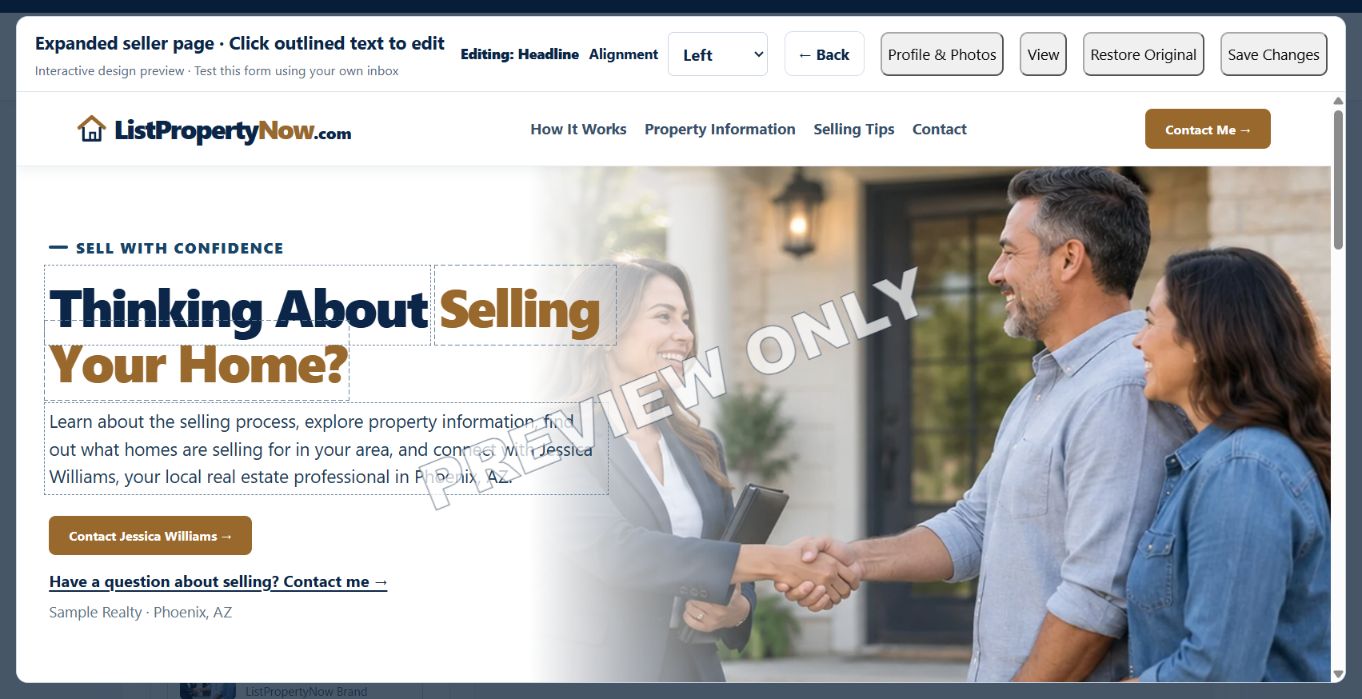
- Profile & Photos: Open your dashboard and landing page editor. Add your photo, name, brokerage, business contact information, service area and applicable license details.
- Edit your message: Select the outlined text and customize your services and seller introduction. Keep professional and brokerage disclosures accurate.
- Save Changes: Save in your member account to publish your changes. Confirm your details are correct.
- View and copy: Preview your page on a phone. Copy the public personalized page URL from your dashboard’s page-link controls. Open it while signed out and check the contact path.
From your dashboard to Facebook
Get, copy and paste your page link
- Find your link: Sign in to the agent dashboard. Under “Your public seller-page link,” you will see your complete personalized URL.
- Copy: Click or tap Copy Page Link. Wait for “Page link copied.” You can also use Copy Page Link in the landing-page editor toolbar.
- Open Facebook: For an ad, choose Website as the button destination and click its Website URL field. For your business Page, open About → Links → Edit and click Link. For a post, click the post text area.
- Paste on a computer: Click inside the intended field and press Ctrl+V on Windows or Command+V on Mac. Alternatively, right-click and choose Paste.
- Paste on a phone: Touch and hold inside the destination field, then tap Paste. If asked, allow pasting for this action.
- Check: Confirm the entire URL is there, with your own name at the end. Preview/open it before publishing. It should show your seller page without asking the homeowner to sign in.
If copying is unavailable, open “My Landing Page,” select the complete address in the browser’s address bar, and choose Copy. Avoid copying an editor, dashboard or account-access URL.
Share the public seller page, typically listpropertynow.com/agents/your-name/. Do not use your dashboard, sign-in, editing or account-access link in an ad.
Practice in the public demo →Guided visual walkthrough
Step 1 of 4
Sign in to your ListPropertyNow account and open your landing page editor.
Move through each step at your own pace.
Tutorial 3 · Connect the ad to your page
Send Facebook Ad Traffic to Your Page
 123
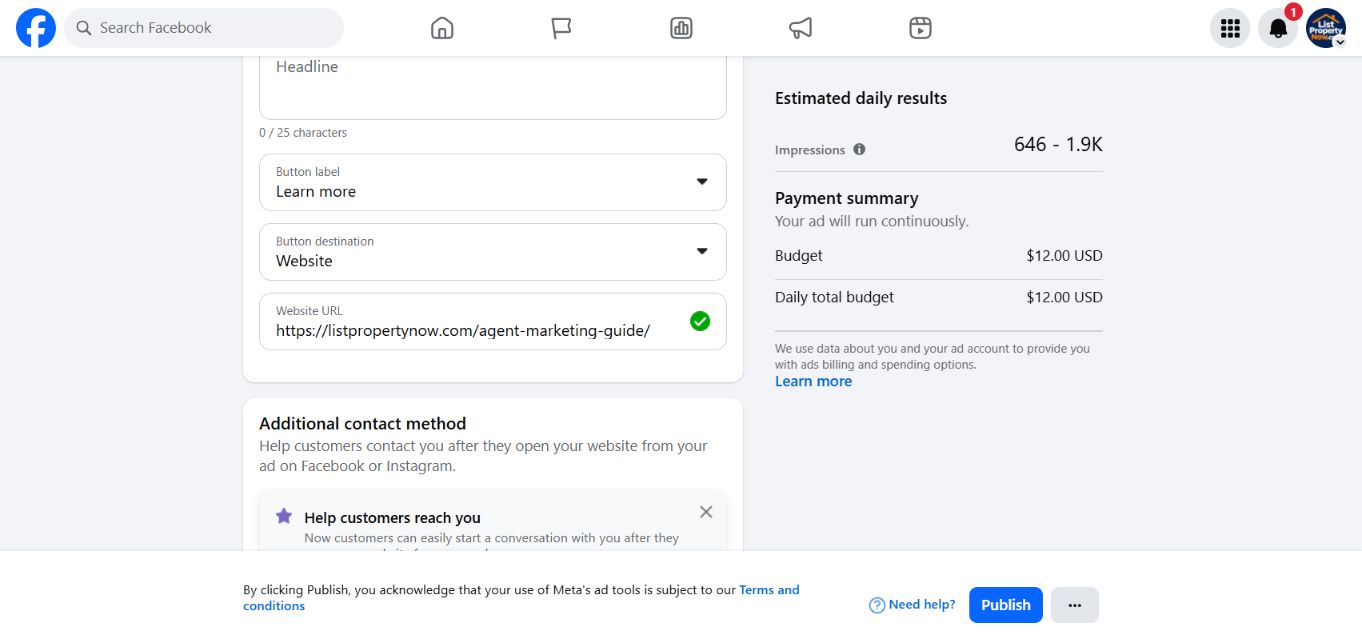
- Switch to your business Page. Open Create ads or Ad Center → Create new ad. Choose a goal that supports website visits. Add your supplied graphic, seller-focused ad text and headline.
- In the screenshot, 1: Button label is Learn more; 2: Button destination is Website; 3: Website URL is where you paste your personalized page link. Available labels and screens vary by goal and account.
- Preview the ad and its destination. Confirm it opens your page with your own name, photo and contact details. Check on mobile too.
- For seller-facing real estate advertising, review Meta’s applicable Housing special ad category requirements and audience restrictions. Check your brokerage’s advertising requirements. The company example screen may suggest a category based on the company Page; do not copy that suggestion blindly.
- Review the budget, end date, placements and any automatic budget changes. Publish only when you are ready to pay Meta for the ad. Advertising costs are separate from your ListPropertyNow subscription; results are not guaranteed.
Guided visual walkthrough
Step 1 of 4
Open your business Page → Create ads. Choose a goal that supports visits to a website.
Move through each step at your own pace.
See the finished connection
Illustrative training example—not a live Facebook ad. No ad is published and no ad spend is triggered.
Sample agent · Sample Realty
Sponsored · Illustration
Sponsored · Illustration
Thinking about selling? Explore the process and connect with a local real estate professional.
Your next move
starts with a conversation.
starts with a conversation.
LISTPROPERTYNOW.COM
Thinking about selling your home?
Personalized seller page
Your name. Your photo.
Your contact information.
The ad button opens the public page whose URL you entered.
Seller inquiries go directly to you.
Open the sample seller page →Tutorial 4 · Start sharing without ad spend
Share Your Page Without Running Ads
 123
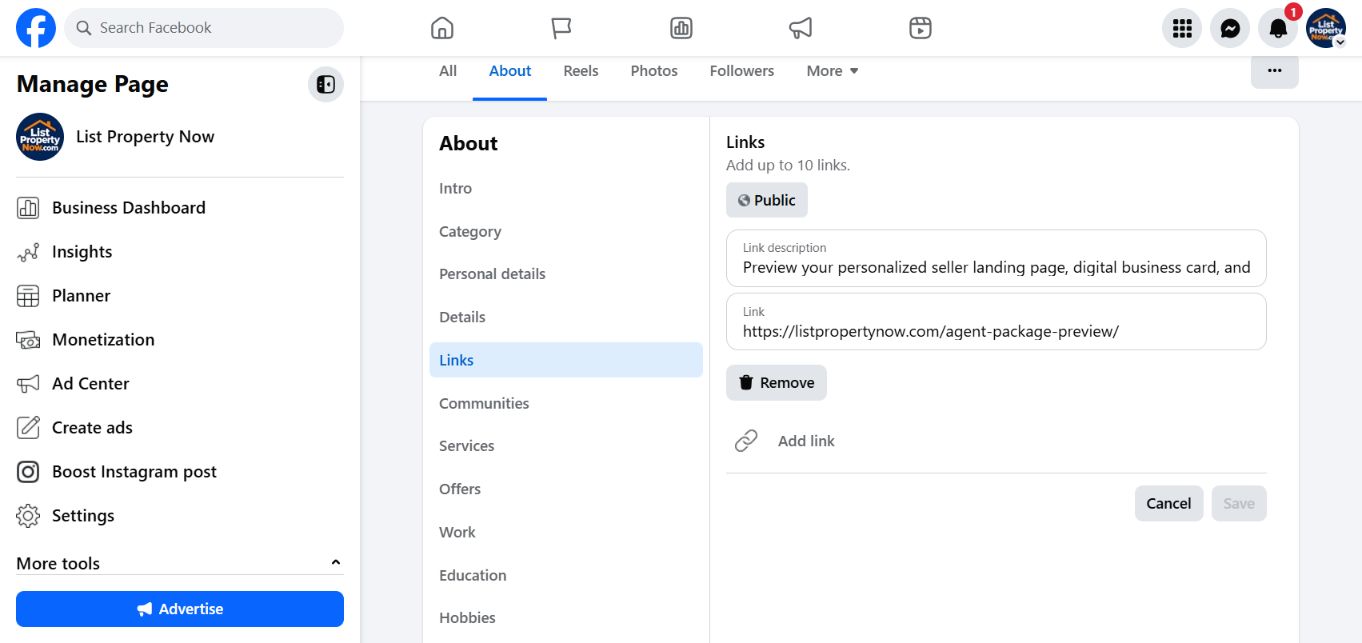
- Business Page link: Switch to your Page, open Edit → About → Links (or the website/contact section in your layout). Confirm the information is intended to be public.
- Description: Add a clear label, such as “Thinking about selling? Explore my seller page.”
- Link: Paste your personalized public ListPropertyNow.com URL and save. Open it from the Page to check it.
- Helpful post: Create a post with your link and a seller-focused message. Check the link preview before publishing. Use the post’s three-dot menu to pin or feature it if your Page offers that option.
- Personal profile: Switch back to your personal identity to share the link there. Select the audience you intend, then review the post before publishing. A normal personal-profile post does not gain an ad’s Learn More button; the shared link is the destination.
Example post to personalize: Thinking about selling in [your area]? My seller page explains the process and makes it easy to contact me with questions. [Paste your public page URL] · [Your name, brokerage and required disclosures]
Guided visual walkthrough
Step 1 of 4
Switch to your business Page. Open Edit → About → Links and add your public page URL.
Move through each step at your own pace.